
For one of the initial tests of my new
Uni-ball Watercolor Pencil set, I decided to do a step-by-step demonstration of coloring a waterproof sketch with watercolor pencils. The
Cretacolor leadholder loaded with the oil-based
Nero lead was used to sketch this whimsical picture of two jungle animals-costumed characters on a
Moleskine watercolor sketchbook, and the set of watercolor pencils was used to quickly color it just like you would using regular colored pencils. The
Nero lead was chosen because it does not smear as much as soft graphite pencil, and it behaves more like an oil-based black colored pencil. It did stain the tips of the watercolor pencils, so I was careful to avoid touching the
Nero black outlines while coloring with the
Uni watercolor pencils.

For the initial flat coloring is not necessary to saturate the outlines with the dry watercolor pencil marks since the steady flow of clean water from the
waterbrush will blend and spread the pigment through each section of the illustration.

Close up of the loose dry coloring of the costumed girl's head.


I often find it easier to start at the head and work my way down. The yellow and ochre parts of the face, beak, and wings were moistened first. Then the pink and orange of head and upper body parts were further defined followed by the blue head feathers.

The
waterbrush was used to selectively blend the dry colored pencils marks with water. It is more efficient to start from the lightest color and work towards the darker ones, so that the brush tip does not require too much cleaning between color changes.

This compact set up can work in very small spaces like this food court table. Taking a few minutes to stretch my legs and allow the initial flat coloring to dry a bit so later color applications will not run into each other uncontrollably.

Picking up pigment directly from the point of the
Canary Yellow watercolor pencil with the moistened waterbrush to add some shading to the beak and wings. Watercolor pencils are quite a versatile medium functioning both as effective drawing tools as well as a ready source of watercolor paint. A few darker shades were added in a similar manner to add volume and texture to the initial flat coloring.
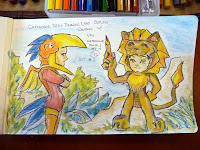
Finished illustration.
 Final reminder tip
: Use a napkin or paper towel to wipe the waterbrush clean between color changes and to wipe dry moistened pencil tips to prevent them from crumbling and weakening after using the pencils as watercolor pans.
 Learned quite a few facts about giraffes, took tons of photo references at the Naples Zoo, and had quite a pleasant day with family. All in all a Sunday well-spent. Zoo visits can provide tons of opportunities for improving your animal sketching skills and gathering plenty of photo reference material at the same time. The small Moleskine sketchbook is just the right size to carry around for taking a few visual notes during such outings.
 The leopards provided some exciting action shots.
 Malayan tiger awaiting a treat at the Meet the Keeper show.
 Keeper getting close and personal with a gator during feeding time.
 Well-fed Florida panther. One of the best features of this zoo, is how close visitors can get to the animals and the glass viewing areas that allow for some picture taking without the wire net in front of them.
 Lion getting a meat treat from his keeper.


 Posts
Posts


